Learning Download: How to Grow Husk Cherries
From Seed to Harvest: A guide to growing husk cherries.
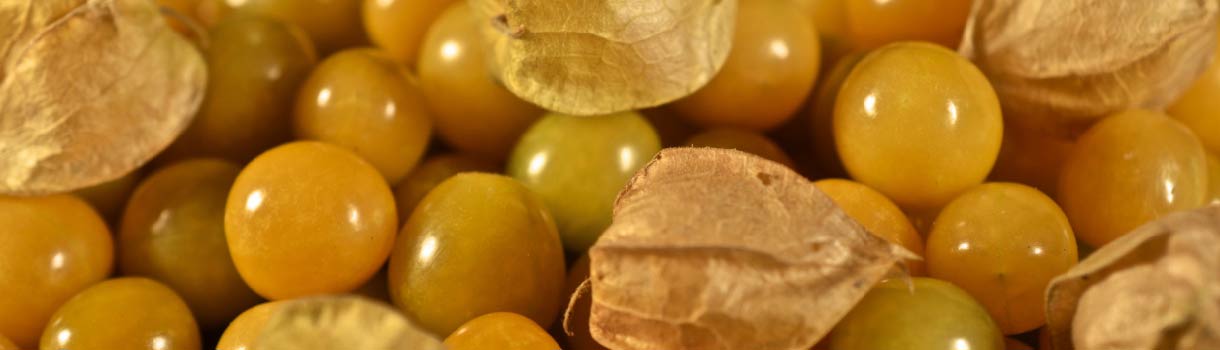
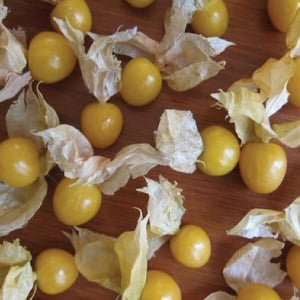
Husk cherries, also known as ground cherries, are similar in shape and size to a cherry tomato, but the fruit is covered by a thin, papery husk. The husk cherry has a taste referred to as sweet and tropical like a pineapple with an underlying tomato taste. Husk cherries are produced on small shrubs.
To plant:
Husk cherries can be grown in a garden, a raised bed or a container. Start the seeds indoors six to eight weeks before the last frost date. Seeds may be slow to sprout, but once their growth begins it remains steady throughout the season.
To grow:
When you transplant, plant seedlings 18 to 24 inches apart. The plants don’t grow very tall, so staking is unnecessary, but tomato cages can be used to prevent sprawling. Husk cherries like full sun and 1 inch of water per week.
To harvest:
Similar to tomatillos, husk cherries are ready to harvest when their husk changes colors from green to papery white. The cherries are very easy to pick at this stage. If a heavy fall frost will hit, harvest the cherries even if their husks have not ripened. The cherries can ripen indoors, like tomatoes. When harvested, the cherries can be eaten fresh or aded to recipes like salsas.
What husk cherries crave:
husk cherries are a low maintenance vegetable, but gardeners can add an all-purpose fertilizer when the plant is first established and also when the plant begins to grow blooms.
Where to buy husk cherry seeds:
You can find husk cherry seeds at Urban Farmer.
Learning Download: Common pests and diseases: Husk cherries
Common pests and diseases: Husk cherries
When growing vegetables, it is always exciting to care for the plant throughout its growing phase and then harvest it for delicious recipes later on, but one thing to watch out for is pests and diseases. Different plants are susceptible to different types of pests and diseases, and it is important to make yourself aware so you can keep a watchful eye and also take any preventative methods to keep your plants safe throughout their lifespan.
Husk cherries, unlike other vegetables, are relatively disease and pest free, but they can fall victim to several different pests and diseases if grown inside first.
Pests:
Husk cherries are most susceptible to pests when they are seedlings started indoors because there are no predators to take care of the pest problem.
Certain insects that can affect husk cherries during the indoor seedling stage include aphids, white flies and fungus gnats.
Aphids are small, soft-bodied insects that will feed on the seedlings’ stems and the bottom of the leaves. Symptoms include leaves that feel sticky, curled leaves or a weakened plant that seems to be dying despite proper watering and nutrition. To prevent this problem, utilize insecticidal soap or neem oil. Once transplanted outside, ladybugs will feed on the aphids. White flies are small, white flies that feed on the undersides of the leaves, and their treatment is the same as the treatment for aphids.
Fungus gnats are small, dark gnats which lay larvae that will live in the soil and eat the roots of the husk cherries. This slows the seedling’s growth and seedlings will die if left untreated. To prevent this, add beneficial nematodes to the soil.
Once transplanted outside, husk cherries are disease and pest resistant compared to other common garden plants.
Occasionally, pests such as leaf-footed insects will bother the husk cherry plants late in the summer. To treat this issue, remove the insects with gloves and put them in soapy water to kill them.
Diseases:
Unlike many garden vegetables, husk cherries are very resistant to diseases.
When being grown inside, husk cherries can fall victim to damping off, which is the death of young seedlings due to a fungal disease. Symptoms include the young seedlings withering and dying, and this sometimes occurs very suddenly. To prevent this disease, be sure not to overwater and allow for good air circulation between your seedlings. Don’t plant too close together and also be sure to plant the seedlings in a sterile potting mix. Sterilize any seed trays if you are reusing them. If you notice a seedling has fallen victim to damping off, immediately remove it from your other seedlings and destroy it. Do not place it in the compost.
